Frayed Fabric Flowers

Honestly, girly girl is definitely not the words I would ever use to describe myself.... until today. I was browsing the web to find out how to make flowers out of fabric. I have boughten Alexia head bands with them and they looked easy enough to try. I found some tutorials and set to work. I literally made these flowers in about 10 minutes!! I was so excited I made three more and was filled with glee when we had an opportunity to wear them that very night. Is it possible that I have a girlish side that is beginning to ooze out?! And all because of a two year old!

Here is how to make your own frayed flowers
First cut your fabric 44 inches long and 1 inch wide. (FYI- I had scrap fabric that was only 22 inches long and they still looked nice so if you have some old fabric to use up don't be afraid to alter the measurements a little.)
Begin by folding the edge and secure it with a stitch.

Then start doing a gathered stitch along the edge. For those of you who are as clueless as I am when it comes to sowing, here is a photo of what a gathered stitch looks like.

Pull the thread so the fabric gathers and bunches up.... hence, a gathered stitch!

Twist and over lap the fabric into a flower.

Hold it securely and stitch from the back to the front and continue until you feel it will hold in place.

Sow on your button.

At this point you can sow the flower onto a ponytail hair bands, your favorite shirt or a hand bag or hot glue it to a headband or hair clip.
Once you are finished here is a easy way to secure your thread. I don't know if it is the best or most current way to do it but it's how mom taught me. Slide your needle through the fabric.

Wrap the thread around the tip of the needle a few times. Use your thumb nail to hold down the thread while you pull the needle the rest of the way through. I do this a few times just to be sure.

Have fun!!

Teapot Birthday Cake

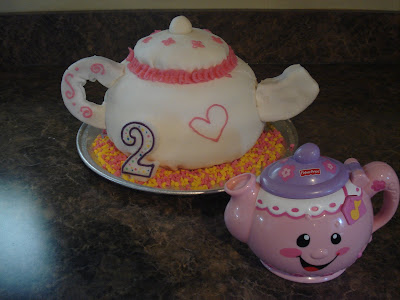
Want a fun cake idea for the little princess in your life? Check out this fun and easy teapot birthday cake I made for Alexia's second birthday.


I started with a round bowl like baking dish to make the pot and this fun mini bundt cake pan for the add-on's. If you don't have a bundt pan you can easily make the handle and spout out of fondant icing.


I started with making two bowl cakes and decided that I needed to add just a regular round cake to the middle to make the shape look right. You may need to do a little trimming depending on the size of your baking dishes. I use two cake batches between these three cake layers. I just used my favorite box cake mixes and you could use different cake flavors to add a little fun. I then used Betty Crocker pre-made icing to make life easy. These days, with two kids, it's all about quick and easy. The icing works great to level out any lopsided edges in the cakes.

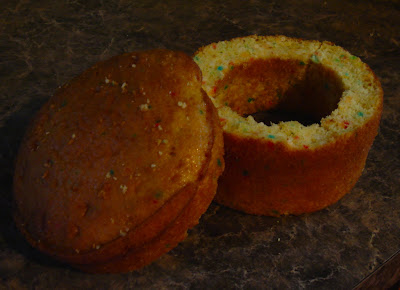
I cut the top off the bundt shaped cake and used that as a lid for the teapot.
I then saved the circular portion to make the hand and the spout.

I covered the cake with plenty of icing. This way the fondant icing will stick and for those who don't like the taste they still could enjoy the traditional icing underneath. Just an FYI, most kids love ANY kind of icing and a few of the adult didn't mind it so fondant is not the worst thing you can serve at a party

To make the handle of the teapot I cut the circular cake in half vertically and horizontally.

I used the left over piece to make the spout, cutting it half yet again and stacking it.

Fondant icing can be very tricky so, once again, to make life easier you can buy pre-made fondant. Once I had the icing rolled out I used a small bowl to cut out an opening for the lid of the teapot. This gave definition between the lid and the rest of the pot. I now wish that I had cut some off the back because I ended up doing a lot of folding which doesn't look too smooth.

I saved some of the fondant to cover my add-on's

The fun part was using pink icing to decorate, create
and most important to hide all my mistakes! Again, using
pre-made pink icing from a tube.

I am realizing now his cake was harder to explain than is was to make so feel free to ask me questions! Happy baking :)